|
Improving the CG-5 Equatorial Mount
Declination Axis, Part 1
Here is the step-by-step procedure I followed to disassemble the declination axis. Although these pictures show the Dec assembly joined to the RA assembly, you'll find it easier to perform these steps if you separate the two sections of the equatorial head as shown on the previous page.
|
|
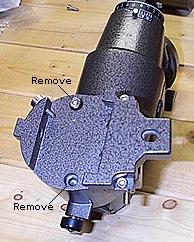
Remove the two large hex head screws in the top of the dovetail bracket. This allows you to remove the bracket and an attached portion of the Dec housing.
|
|
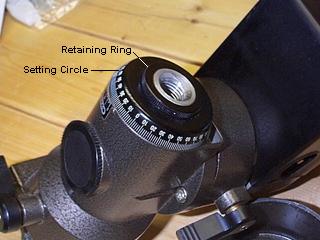
Turn the Dec assembly upside down. Unscrew and remove the black retaining ring. Immediately under the retaining ring is a clear plastic washer, the first of many you will encounter. Remove the washer, and place it in a storage container. Mark the container or otherwise note where the washer came from, so you can put it in the correct location when you reassemble the equatorial head.
The setting circle can now be removed. In my CG-5 there was a stack of FOUR plastic washers immediately beneath the setting circle. One or more of these may adhere to the underside of the setting circle, so be sure you carefully remove and store each washer.
|
|
|
|
|
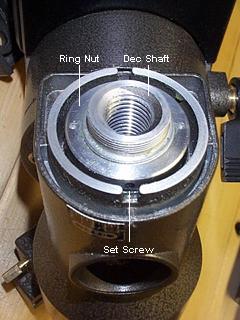
Removing the setting circle exposes the ring nut that holds the Dec shaft in its housing. The ring nut is secured by two small hex head set screws. These can be reached through a slot in the wall of the housing.
Rotate the Dec shaft until one of the set screws is visible through the slot. Loosen, but DO NOT REMOVE the set screw. Rotate the Dec shaft 180° to align the second set screw with the slot. Again, loosen, but do not remove the set screw. The set screws are deep in their threaded holes and are difficult to see. You'll have to probe around with your Allen wrench (hex driver) until it slips into place. Try a 1.5mm hex driver here.
 The ring nut can now be unscrewed from the Dec shaft. If your CG-5 is anything like mine, the ring nut will be tight. I used a small piece of stiff wire placed into one of the two small indentations on the face of the nut to hold it in place while turning the Dec shaft by hand. Some CG-5 owners have found it necessary to make a "spanner tool" from two small nails (or better yet, drill bits) and a block of wood. The nails (or drill bits) are spaced to match the distance between the indentations. Insert the ends of the nails (or drill bits) into the indentations on the face of the ring nut to hold it firmly so it can be unscrewed from the Dec shaft.
There is a plastic washer under the ring nut. Carefully remove the washer, and set it aside.
The Dec shaft can now be removed from the Dec housing.
|
Declination Axis, Part 2 »»
|