 |
|
|
 |
|
|
|
Adjusting, Dismantling, and Re-assembling the SkyTee-2 (or TS-AZ5ST) Telescope Mount
This is a fairly lengthy, but detailed, description of my experience with dismantling, lubricating, re-assembling, and adjusting this sturdy alt/az mount. It complements a review of the mount that I posted on CloudyNights.com. Both posts may be useful reading for anyone who already owns, or is considering buying, one.
I should make it clear that I'm no expert with these things. Although I think that I now have a reasonable understanding of how these mounts work, the statements in both posts are just my opinions – yours may differ! If you decide to follow my example, bear in my that it's entirely at your own risk and may invalidate your warranty. Please read the entire post slowly all the way through before you start work, and take care not to over-tighten anything!
The SkyTee-2 Mount
After much research, I bought one of these mounts in the spring of 2021 to use with a Skywatcher 120ED refractor. This is a mid-size scope and weighs around 7 kg (15 lb) including accessories. The SkyTee-2 mount has been in production for around ten years, during which time a number of design and manufacturing issues were identified by users. Although I suspected that most, if not all, of these had been resolved, I decided to dismantle my new mount to take a look inside.
In retrospect, I needn't have bothered to do a thorough strip-down. If you are satisfied with the feel of the moving parts (not too tight and not too loose), I suggest that you leave it alone. You may check that the small grub screws in the secondary end cap aren't loose. You may also check the three socket cap screws in each of the two black mounting pads, and also in each of the fine adjustment worm-drive assemblies. Be particularly careful with the latter, especially the single screw in the middle of each cover. Do not over-tighten!
On the other hand, if your mount has any backlash or is definitely too tight, it's not difficult to correct this. If the backlash is in the worm-drives, you may not even need to dismantle anything (see the note below). If there's axial movement in either the horizontal or vertical direction, then you will need to do some partial dismantling to correct that (and similarly if movement is too tight).
Grease
Tools
If you decide to work on your mount and don't have screwdrivers, I suggest that you always hold the short leg of the L-shaped wrench and insert the end of the long leg in the screw to avoid over-tightening. Also, once dismantled, you will be confronted by a pile of parts, many of which look very similar. It's going to become very frustrating very quickly if you don't keep track of what goes where, so be methodical, go slowly, tackle one area at a time, take photographs as back-up, and lay the parts out in order on a dust sheet as you go. I should mention that you are going to get very sticky from the grease, so get used to the idea and be prepared!
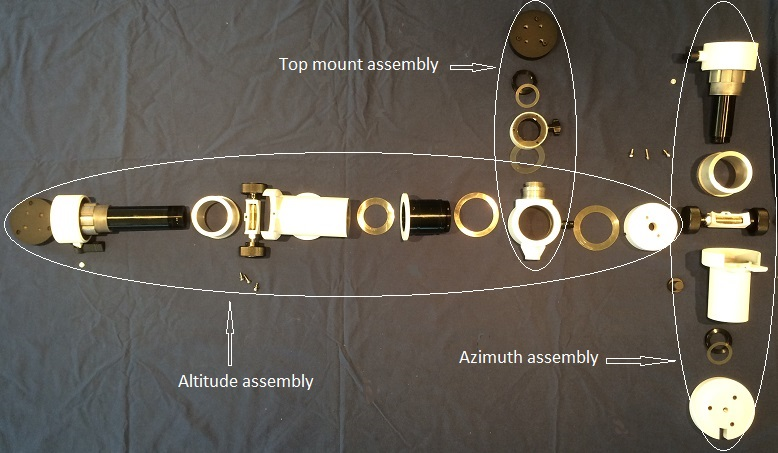
The Mount
Here's a photograph of the SkyTee-2 mount followed by one of my mount after being dismantled:
Testing and Adjusting Alt/Az Backlash
If the mount is assembled correctly and the alt/az locking levers are released (turned counter-clockwise), the scope should rotate freely around both axes. When the locking levers are applied, free rotation ceases and motion is controlled by the fine adjustment worm-drives.
The objective is to just eliminate any backlash in the worm-drives – if you tighten more than is necessary, you will apply loads that are higher than necessary.
The worm-drive housing has a total of five screws: three socket caps that need a 3 mm wrench and two grub screws that need a 1.5 mm wrench. The two grub screws and the single socket cap between them are for adjusting the mesh of the worm and wheel gears, while the other two screws lock it all in place.
It's useful to understand that tightening the grub screws jacks up the worm-drive assembly, loosening the mesh of the gears. Tightening the middle screw tries to pull it back down again. Thus the screws work against each other to hold the assembly in a given position. You have to juggle these screws until you just eliminate any backlash. You then tighten the two socket caps on the front to lock everything in place and test again for backlash. Repeat all this as many times as necessary!
A word of caution: you have a pair of very small grub screws running in threads in a soft metal casting. If you need to turn them, take the load off them first by slightly loosening the middle socket cap screw. They will then turn freely.
Do this backlash check and adjustment for both the altitude and azimuth worm-drives, then check that all the fine adjustment knobs turn smoothly. If you're lucky, this may be all you need to do.
If the Locking Levers Fail to Lock
Adjusting for End-Float and Friction
Undo the grub screws a few turns, but don't withdraw them completely. Tighten or loosen the ring slightly as appropriate. Keep adjusting the ring until the play has been eliminated and the motion is to your liking, then tighten the grub screws. The grub screws bear directly onto the threads on the shaft, so don't over-tighten them or you will damage the shaft.
If you were aware of any roughness or grinding noises within the azimuth assembly, you may wish to disassemble it further to clean and re-lubricate the bearing surfaces. Before you do this, you should have some fresh grease on hand. As I said earlier, I believe that using a damping grease is a good idea. It's expensive stuff, but I found a 50g tube on eBay for a reasonable price. This may sound like a small amount, but it's plenty.
To dismantle further, you must undo and remove the ring. After loosening the grub screws a few turns, the ring should unscrew. It may be stiff at times, because the grub screws inevitably cause some damage to the threads. Work the ring progressively back and forth as you unscrew it. Take care not to damage or lose the plastic washer.
Remove and withdraw the three socket cap screws retaining the worm-drive housing, and then withdraw the housing assembly. Remove the locking lever, screw, and button as described earlier. Withdraw the gear wheel cylinder from the remaining shaft assembly (expect to encounter a fair amount of grease).
There's not much point in dismantling further, so carefully inspect every part for signs of rubbing, wear, or inadequate lubrication. Clean if necessary, but you may as well leave uncontaminated grease in place. Remove all traces of grease, if any, from the outside of the gear cylinder where the locking button will bear, and from the adjacent inner surface of the housing that surrounds the gear cylinder.
Reassembly is, as they say, the reversal of disassembly. Ensure that there's plenty of grease on the fluted surface that the gear cylinder rotates on. It's a good idea to smear some in the bore of the cylinder as well. Then smear some grease in the bore at the end of the main housing and the corresponding area of the black shaft. Apply grease to any other obvious bearing surfaces and then carefully slide the gear cylinder back onto the fluted shaft and fit the whole assembly in the main housing.
Apply a smear of fresh grease to both faces of the plastic washer and carefully put it in place, then screw the ring back on. Refit the worm-drive assembly as well. You will need to experiment by tightening and loosening the ring while rotating the shaft assembly back and forth in the main housing until you get the feel that you want without out any apparent play. Remember that part of the grease's job is to create a lot of viscous drag – "friction" – so don't leave it too loose. There should be firm resistance to rotation. When you have it right, tighten the three grubs screws – but not too much or you'll damage the threads on the shaft! Then replace the bottom flange.
Now refit the button, locking screw, and azimuth locking lever. Position the lever so that it has plenty of travel left to clamp the button against the gear cylinder before you replace the crosshead screw.
All that remains is to adjust the backlash in the worm-drive assembly as described above.
2. The Altitude Axis
The altitude axis is very similar to the azimuth axis in design – it's just a bit more complicated due to the addition of the top mount. One important point to note is that while the azimuth axis has a threaded locking ring with grub screws that you use to adjust the play and friction on that axis, the altitude axis has two such mechanisms – one for the top mount and one for the primary end mount. Adjusting the friction for the top mount is very simple, adjusting the primary mount involves a little more disassembly, and re-lubricating the primary mount and the altitude worm-drive involves more disassembly still.
The friction of the top mount is controlled by the white end cap itself. Just loosen the three small grub screws around the periphery of the end cap and you will be able to rotate it clockwise or anticlockwise to tighten or loosen the fit respectively. If you want to re-lubricate the top mount, loosen the grub screws and remove the end cap. Then loosen the top mount's locking screw and withdraw the whole assembly. Watch out for the plastic washers – there's one each side. Apply fresh grease to both sides of each washer and to the bearing surfaces of the housing and shaft, and re-assemble. Take care to avoid getting grease around the portion of the shaft that the locking screw bears on. If you apply grease to the innermost part of the shaft and the outermost bore of the housing, you will be able to re-assemble without smearing grease on the locking portion.
If you want to adjust the primary mount, you can do so while the top mount assembly is removed. If you look closely, you will see the now-familiar three grub screws around the far end of the shaft. As usual, loosening those grub screws will allow you to rotate the shaft to loosen or tighten the fit of the primary mount, and indeed the whole altitude axis. Also as usual, don't over-tighten the grub screws when you've finished.
If you want to re-lube the primary mount and the altitude worm-drive, you will need to unscrew and withdraw the shaft. As with the azimuth mount, the shaft may be stiff at times, due to minor damage to the threads caused by the grub screws. Again, work the shaft progressively back and forth as you unscrew it. Take care not to damage or lose the plastic washers.
Once the shaft is off, you will be able to withdraw the main housing (after removing the worm-drive assembly) and then proceed with the removal, re-greasing, and replacement of the altitude gear cylinder. This is the same procedure as for the azimuth axis, so I won't repeat it here. When re-assembling, apply plenty of grease while avoiding getting it on locking surfaces.
When you come to replace the shaft and set the friction, you can put the mount on your tripod and mount a telescope if you wish. Having a mounted scope will help you to set the level of friction that you want. Bear in mind that damping grease is intended to be very viscous and sticky, and to create a lot of drag, so don't try for the kind of low-friction fit that you may expect from a mount that uses needle roller bearings. Replace the worm-drive assembly as well and adjust it to just eliminate backlash as described in the azimuth section above. When you think you have it right, check for consistent smoothness over the full range of motion, and tweak as necessary. As usual, go slowly and steadily.
When you have it right, replace the top mount assembly (don't forget the washers) and end cap. Set the end cap to give you the friction and feel that you want, but read the next section before tightening the grub screws.
Aligning Dual Saddles on the Two End Caps
First, if you can lay your hands on some damping grease, using it on just the washers either side of the top mount may give you enough "sticktion" to do the trick.
Second, the black primary mounting pad is fixed to its end cap via three socket cap screws which are evenly spaced at 120°. Thus removing the screws and rotating the mounting pad by 120° will reduce the worst-case misalignment from 90° to 30°, which is a big improvement. Your altitude locking lever will move around by 120° in the process, but this probably isn't a problem.
Third, you could cut and fit an additional plastic washer to use as a shim. The secondary end cap has a thread with a 1 mm pitch, so 90° is equivalent to 1/4 mm or 0.010". A washer cut from a piece of plastic sheet ten thousandths thick should bring them into close alignment. Use proportionally thinner material if your misalignment is less than 90°. Test your plastic's resistance to grease first.
Finally, if you're a closet machinist, you could turn a few useful accessories that will enable you to tune out the misalignment with some elegance as well as precision. See Dave's solution in the "SkyTee-2 dovetail alignments" thread in the StarGazersLounge.
Adjusting the Top Mount
Finishing Up
Copyright © 2021 M. Ward
|
 A Note from Astronomy Boy
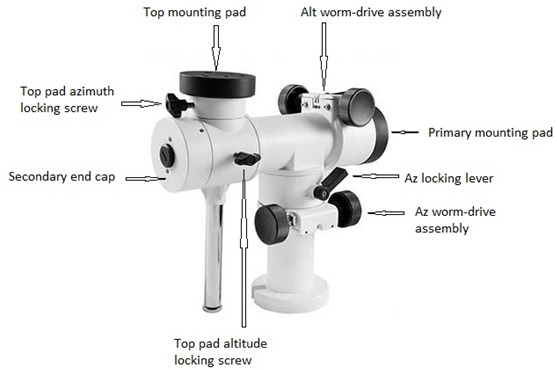
 With the appropriate (alt or az) locking lever in the locked position, undo the two socket cap screws and then very lightly nip them back up. Then loosen the middle socket cap screw very slightly. You will probably be able to feel some backlash when you gently rock the scope to and fro. Next, tighten the middle screw until the backlash just disappears. You can confirm this by turning the fine adjustment knobs backwards and forwards very slightly. Again, you are trying to just eliminate any backlash. If you can't get it to disappear, loosen the two grubs screws very slightly and try the middle screw again.